Saturday, April 27, 2013

CB Performance Shift Coupler

I love it when someone comes up with a great idea to improve a part that drastically needs it.  The shift coupler on the VW Bug chassis just plain sucks.  I'll bet the original designer wishes they could take it back and replace it with something else.  I updated to a newer one about a year ago with fancy urethane blocks but it still had the same way to attach the coupler to the transaxle - a screw going into a odd shaped sleeve that doesn't fit any tool I own.  I had to make something special.  In order to install the new I had to take the old coupler out and that took the better part of an hour while I was bending over on my knees in a contortionist stance.  Installing the new coupler took less than 10 minutes and used tools that I own. Wow!! I'm digging this.

In addition my old coupler made a lot of noise, this one is very quiet.  Once again, CB Performance gets a thumbs up from me!


CB Performance Camber Compensator

I stumbled upon this item while looking for various VW Air-cooled Bug parts. (Will my chassis ever stop needing repairs?)  In theory it makes turns a whole lot better. You don't feel like you're going to tip over.  In my case the extra weight on the back axle seems to make turns worse. I usually have to slow way down before I take a turn.


It looked pretty simple to install, the straps on the end attach to the axles, and the plate in the middle attaches to the bottom of the transaxle.  I read on a critique that someone said it was a pain in the @## to get this on.  I decided I would take the middle plate off first just to make sure it fit my transaxle.  Good thing I did, it was about 1/16 of an inch off, I needed to grind down forks on the inside.

I spent probably about 45 minutes going back and forth from the grinder to underneath the car to make sure it fit.  Another small problem was the Butt Sag bar was sitting in the way.  So I loosened that up to make room.  The plate in the middle uses the existing bottom bolts from the transaxle.  To install I first attached one side, then the middle then the other side.

Eventually I took a short 5 mile drive and was very impressed.  I felt like I could take corners at the normal speed I'd take my Pruis at.  I'd highly recommend anyone get this, as long as they have a grinder to make the necessary adjustments.
The only negative comment I can make is this plate covers your lower transaxle drain plug.

Sunday, April 7, 2013

MiniBMS Fixed

Previously, my MiniBMS was in the state of constant alarm.  It happened one day, long ago when I was backing out of the driveway when the alarm started buzzing and just wouldn't stop. I drove it home and from there, it's been an off and on project throughout the winter.  For the meantime I would recharge the battery pack by bypassing the MiniBMS charger relay and manually control the current and do a top charge every now and then.

Since I was convinced it was the MiniBMS headboard that was at fault, I bought another one.  I installed it and felt like Einstein's definition of insanity - not the workout, the madness.  NO CHANGE.  Domitri, the guy that owns MiniBMS stated in an email he thought it was a "wiring problem."

Remember the fire I had sometime ago?  When I went poking around I found some crispy wires that sure needed to be replaced.  After that I completely rewired the MiniBMS headboard with all new wires.  Then I decided I should check all the cell boards. I was shocked to see 10.4 Volts coming from the cell loop.  I tested most of them and found a board that was stopping the flow completely.  I hit the emergency disconnects, disconnected the DC to DC and replaced the board - I have a few extras on hand.  Then when I tested the cell loop again I got 0.7 Volts flowing from all the boards.

I took the car for a quick drive and voila! The light for the charger came on when I turned off the car.  I then went to radio shack and connected a new buzzer to the headbaord and there was no sound. Yes!!! Thank you, Lord!  Then I disconnected one of the cell boards from the loop and the buzzer went off. (stand test to make sure the buzzer is working)

I'm not completely sure what was at fault but either way, it's back to working.  Now if the rain here would stop so I can drive it.

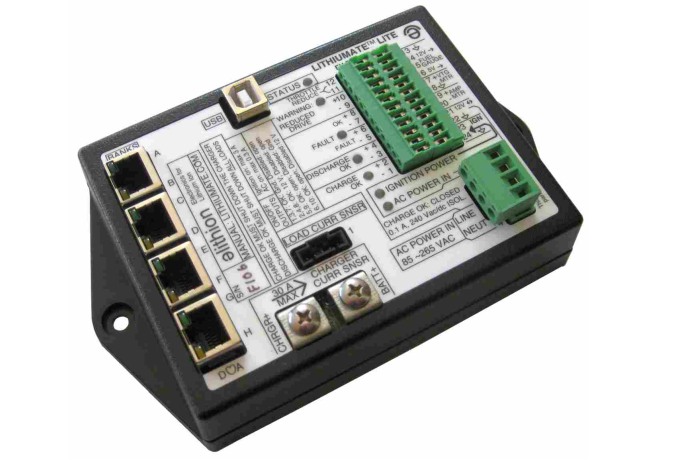
At one point I was looking at the possibility of buying another BMS.  There's a neat page on the Lithiumate site that compares all known BMSs.  http://liionbms.com/php/bms_options.php If one would combine the monitoring capability of the BlueWindow and the reliability of the MiniBMS with the capability to top charge/discharge as necessary and provide real time individual cell monitoring, I'd buy it.  The Lithiumate Lite comes close, but it isn't cheap - $1300 was what I priced my set up at. Then I'd have to find a computer to put in the car for real time displays. For now, I'll stick with what I have.

Pop-up enlargement